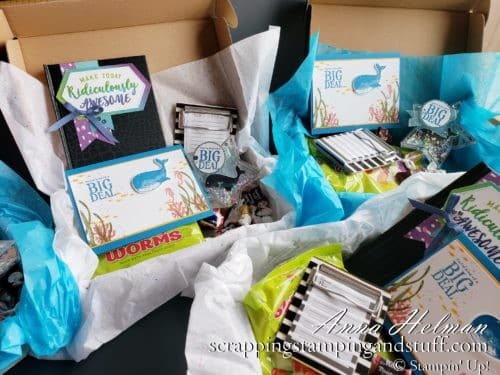
Stampin’ Up’s annual OnStage conferences are always an amazing time collaborating, sharing and supporting other demonstrators around the globe. Unfortunately, this year we weren’t able to meet in person for this event, and last week we gathered virtually instead. As a result, I created fun and personalized goodie boxes to show support to my team members who participated online with me! I made these cute DIY goodie boxes including a few inexpensive gift ideas, and mailed them out. They made fun surprises for a few of my Sassy Stampers teamies!
Listed below are the items I used to assemble my team’s goodie boxes.
Gift Box Contents
I found most of these items during a quick trip to the dollar store.
- Various Treats and Snacks
- Mini Notepad and Clipboard
- Star Frame
- Gummy Worms
- Notebooks
- Card (not from the dollar store of course!)
Below is a list of materials you’ll need for the personalized parts of the goodie box.
Materials
- Stamparatus
- Whale Done Stamp Set
- Whale Builder Punch
- Ridiculously Awesome Stamp Set
- Rainbow Glimmer Paper
- Whale of a Time Designer Paper
- Stitched Nested Label Dies
- Artistry Blooms Designer Paper
- Ink (I used Granny Green, Bermuda Bay, Gorgeous Grape

First, I used a fun technique to achieve the multiple colored image used on the notebook. Let’s talk about it!
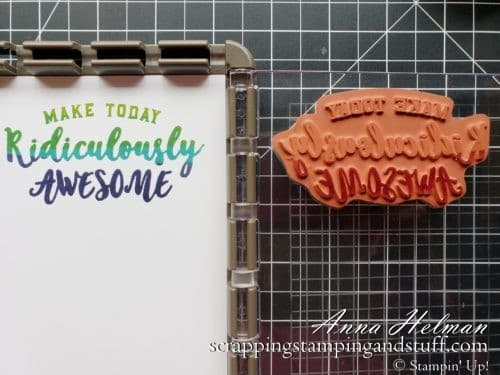
How to Achieve a Multi-Colored Image Using the Stamparatus
After mounting the Ridiculously Awesome stamp to the Stamparatus, ink the top 1/3 of the stamp with Granny Apple Green ink. Stamp onto cardstock.
If you’d like, the stamp can be clean after each application, but it’s not absolutely necessary as long as your colors go from light to dark. Just don’t contaminate a lighter ink pad with a darker color on your stamp!
Next, ink the bottom 2/3 of the stamp with Bermuda Bay and stamp again.
Finally, ink the bottom 1/3 of the stamp with Gorgeous Grape and stamp one last time.
Pretty cute, huh? I love this technique! Next, I’ll show you how to assemble these DIY goodie boxes.
Assembling the Goodie Box
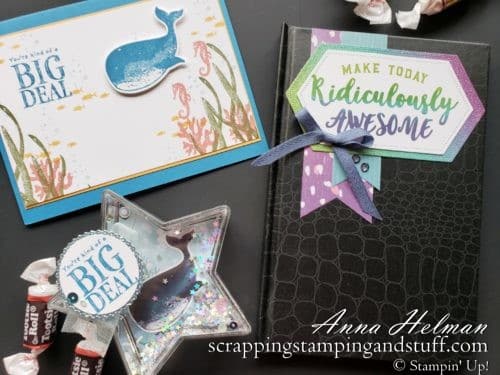
I created the notebooks using the technique shown above. Then I decorated the star frame with the Whale of a Time designer paper, stamp set and punch. I included a personalized message, goodies, treats and notebooks in each box. I packed each one up in one of our Paper Pumpkin boxes.
And there you have it! A fun and easy to create DIY goodie box filled with inexpensive, but personalized gifts. It’s perfect for friends, team members, co-workers, or anyone you want to send some happy mail to!
Don’t Miss Out!
Please make me your Stampin’ Up! demonstrator! Earn rewards points towards free stamps PLUS a gift when you order using October host code: TRZR2FZ6. PLUS, with your first order, you’ll receive free catalogs in your thank you package!
Sign Up For My Upcoming Virtual Card Classes!
Order the supplies I used and make this project yourself!


 Designer Series Paper")
")

You May Also Like:
Leave a Reply