Here it is…one of Stampin’ Up’s biggest sales of the year! Starting today, we have a ton of items up to 60% off! It’s time to clear out inventory and make way for all those awesome new products being released in January. All items on sale are while supplies last, so don’t wait to grab these great deals! Start shopping here.
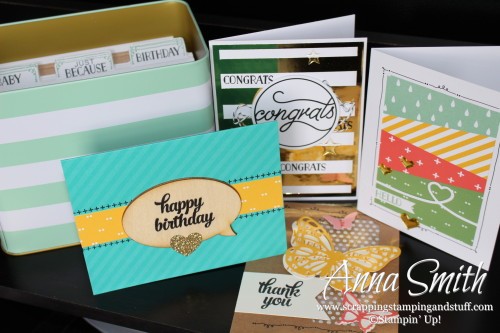
The project I’m sharing today takes center stage on the cover of our Annual Catalog this year. It’s the Tin of Cards Project Kit and it might be one of my favorite products in the catalog. The other night at the Christmas party I held for demonstrators on my team, one of the girls brought her Tin of Cards kit to work on. I had put together a couple of cards from my kit, but most of it was unfinished, so I grabbed mine and we got to work!
In about an hour and a half we had all of our cards put together plus the dividers completed as well. The kit comes with materials for four each of four card designs for a total of 16 cards with envelopes. The entire project is soooo cute. I LOVE the cards and the tin is adorable too. I’m going to use mine as a gift at some point, but for now I’ll hang onto it to show as a sample.
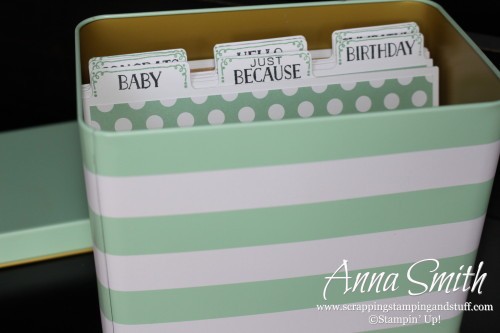
Here is a close up of the tin. It’s a great durable container for your cards. You could throw it in a bag if needed and you wouldn’t have to worry about your cards getting beat up or the lid falling off. Plus it’s cute so you don’t have to worry about finding a ‘hidden spot’ to store it in your home – just leave it on display somewhere!
The kit comes with nine dividers. The Tin of Cards stamp set includes stamps for each of the tabs. If you wanted to add more dividers, we have the File Tabs thinlits dies that could be used to make more.
Let’s look a little closer at each card design. Like I said, you get materials for four of each of these. Let’s start with the Bermuda Bay beauty. The word bubble on these is actually a wooden embellishment, so it gives texture to the cards. Handy tip – give it some oomph when you stamp onto the wood pieces to make sure it stamps evenly.
I love this colorful card. It’s so bright and cheery! Handy tip – when you attach the designer paper, make sure the raindrops are falling from the sky and not the other way around.
Here’s the gold glitz card. Handy tip – when you stamp the small words on the background of the card, make sure to stamp one card with ‘hello,’ one with ‘congrats,’ one with ‘happy,’ and one with ‘thanks.’ Don’t stamp all four with the same word, because when you go to add the large circular greeting you only get one ‘congrats,’ one ‘hello,’ one ‘happy birthday,’ and one ‘thank you.’ Did that make sense?
I saved my personal favorite for last – the butterfly card. Isn’t this one a beauty? Handy tip – only place adhesive under the center of the butterflies so that you can pop up their wings!
So there you go. The Tin of Cards kit is a great gift for yourself or a loved one this Christmas or anytime throughout the year!
Use the links below to see the products I used and do some shopping. Use hostess code Y4HGVHEJ and I will send you a free gift! Even better, sign up for stamp club and you will get free projects and free stamps!


Leave a Reply